Ever want to make your own craters? Well, here's how!
Watch Video:
- conservation of energy
- sediment physics
- formation of the solar system
Theory:
Cratering is an important process in our solar system - in fact it has been claimed that cratering is responsible for the formation of our moon. Furthermore, studying the craters left from impacts throughout the history of our solar system helps us to gain knowledge on how it was formed and the geological history of our own planet.
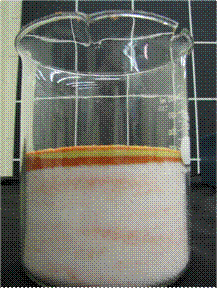
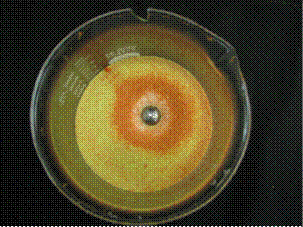
There are many different types of craters, each with a different design. The shape and overall appearance of the crater is based on many factors including the size and speed of the object, and the direction from which it collides. In this demonstration, a very standard crater is formed by dropping a ball bearing straight down into a few layers of sand. The layers in the beaker were initially, from bottom to top, white sugar (with a little orange mixed in from previous experiments), orange sand, and yellow sand. Figure 1 shows the initial state of the target:
|
Figure 3: Set-up for cratering demonstration |
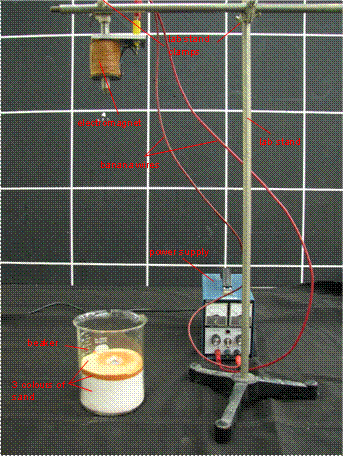
- Set up the electromagnet, lab stand, rod, and banana wires as shown in Figure 3.
- Pour your first colour of sand into the beaker. It is best to make this layer the largest to ensure the ball bearing doesn't hit the bottom of the beaker.
- Pour a thin layer of the second colour of sand on top of the first and then another fine layer of the final colour.
- Align the beaker so that it is directly below the electromagnet. This can be done using the string with the ball and paper clip attached: turn on the electromagnet and attach the paper clip to it so that the ball hangs straight down. Place the beaker below this ball.
- Remove the paper clip, string and ball, and attach the ball bearing to the electromagnet.
- Turn off the electromagnet and observe the crater formed as well as the displacement of the different colours of sand.
SAFETY WARNINGS!
- It is best to make sure the set-up is well-aligned to avoid hitting the beaker with the ball bearing and breaking the glass.